Title
Performance Based Test on Computer Builds.
Abstract
We are testing two different computer builds and seeing what limitations makes one inferior to the other one. A computer part or a list of computer parts will be considered as to why they perform better and how we can get the most out of each build. It can be said that heat has a big role that plays in the performance of each system. Heat can hinder the full potential of a certain computer part and the only way is to use different methods of cooling to solve this problem.
Introduction
Computer are used daily and they are made of many different parts interconnected with wires and pins. The essential part of anything to function is the brain and in a computer that is the CPU. The CPU is connected to the mother board which can be compared to like the core of a person. This is where everything comes together and connects like how the core is connects all your limbs and the head which houses the brain. The CPU is connected to the motherboard with many micro pins on the bottom of the CPU. For all this to run an 8-pin connector is needed to connect the motherboard to the main source of power, the power supply. To be able access memory a computer needs either a hard drive or an SSD. To be able to run application temporarily, RAM is needed which stands for random access memory. The CPU needs either a fan or a liquid cooling system to keep it cool enough to run for a long period of time without failing and frying up. All these parts are essentials for a computer to be considered a computer and be able to run. There are add-ons that make a computer better such as a graphics card that increases the graphics on a computer to a high degree. The objective is to see which computer build performance the best under certain constraints.
Materials
For this experiment you will need
(My personal computer builds)- no constraints
- Motherboard- MSI SLI PLUS CHIPSET Z370 ~ $149.99
- CPU- Intel i7-8700K ~ $369.99
- GPU (Graphics Card)- ASUS ROG STRIX GeForce GTX 1080 TI 11GB ~ $1,699.99
- RAM- G. SKILL Trident Z RGB Series 16GB 3200mhz ~ $218.95
- CPU Cooler- CORSAIR Hydro Series H100i v2 AIO Liquid CPU Cooler ~ $198.98
- Case- NZXT H500i ~ $99.99
- SSD- Samsung EVO 860 500GB ~ $79.91
- Hard Drive- Seagate Barracuda 2TB ~ $59.88
- Power Supply- CORSAIR RM750x, 750 Watt, 80+ Gold Certified, Fully Modular ~ $158.86
- Keyboard- Razer BlackWidow X Chroma ~ $99.99
- Mouse- Zelotes ~ $45.00
- Monitor- ASUS VG248QE 24″ Full HD 1920×1080 144Hz 1ms HDMI Gaming Monitor ~ $100.00
Total Cost of Build= $3281.53
Second Build ( Budget Build)
- Motherboard- MSI Z370-A-PRO ~ $123.54
- CPU- Intel i3-8100 ~ $118.99
- GPU (Graphics Card)- Radeon RX 580 8GB ~ $189.99
- RAM- DDR4-2400mhz 8GB ~ $44.99
- CPU Cooler- Cooler Master Hyper 212 EVO ~ $29.99
- Case- Fractal Design Focus G ~ $44.99
- SSD- Crucial MX500 500GB ~ $49.95
- Hard Drive- N/A
- Power Supply- EVGA 450W 80+ Bronze PSU ~ $41.01
- Keyboard- Logitech Keyboard ~ $25.00
- Mouse- Logitech Mouse ~ $15.00
- Monitor- ASUS VG248QE 24″ Full HD 1920×1080 144Hz 1ms HDMI Gaming Monitor ~ $100.00
Total Cost of Build= $783.45
Procedure (Method)-
CPU:
In this experiment you have build two different computers and tests them out side by side. For both computers the directions are the same. First you take out the motherboard and make sure that there are no damages to the motherboard or else you must return it and get a new one. Secondly, take out the CPU out of the box and make sure to handle with care and don’t touch the bottom pins of the CPU as they are delicate and can easily break. There will be a golden triangle on the CPU that lines up with the triangle on the rectangular socket on the motherboard. You must first, however, make sure that the rod on the side of the socket is in the open position so that the CPU can easily go into the socket without bending any of the pins. Then when secure, put the rod back in the closing position to secure the CPU onto the motherboard. (See manual if you are confused as to how open and close using the rod on the side of the socket)
RAM:
After this, the next step is open the ram from the box and usually right next to the CPU socket is the rows of connectors where the ram sticks plug in. Make sure to set the connectors in the open position by pushing down on the edges of the connectors. Then make sure that the ram stick is lined up with the connectors and push down sticks into the connectors. You should hear a snap sound that tells you they are securely in the connectors. (Note if you have two ram sticks make sure to skip one connector between each one).
IO SHIELD:
The next part takes the IO shield (Refer to the manual as to what the IO shield looks like) that came with the motherboard and push it into the rectangular opening on the case. This can be found on the back side of the case towards the top of the case. Then place the motherboard in the case and align the motherboard with the IO shield. Then screw the motherboard into the case with four screws on all four corners. (The manual will tell you what screws to use)
CPU Cooler:
Now comes the part where you connect the CPU cooler to the CPU itself. The CPU cooler has a radiator that connects to the sides of the case where it can fit with two fans in front of it. Then the other end of the cooler has two pipes with an end on it that is square in shape. This side connects to the CPU with screws on the side. Once screwed on there is a connector that connects to the motherboard for power and communicates between the user and the cooler to keep track of the temperatures. The fans also have connectors on the motherboard that are labeled and can plugged into for power.
GPU (Graphics Card):
This is where you take the GPU out of its packaging and take all the protectors off the connectors. Then the motherboard has a long metal connector on the bottom with a tab to unlock the connector. Before doing this, you must unscrew a few rectangular panels on the back of the case so that the GPU connectors stick out when placed and can be used. Now connect the GPU to the motherboard and all that is left to do is connect all the power supply cables to the appropriate pins on the motherboard and GPU. Now everything should be connected, and the power can be turned on and everything should boot up.
Now to test each system we use different stress tests to test how much load it can take all at once. There are different tests that can be done to test the performance of a system. We will be putting these systems through different stress tests where they must run a bunch of applications at the same time and see how well they can handle them.
Results
The results of the two builds show remarkable differences in terms of performance. The personal build had a graphics card that was significantly higher in terms of performance than the budget build. The CPU showed a significant difference but not as much as the graphics card.

Chart comparison of Graphics cards:
This shows that overall comparison of perf what you get for the price. The personal build has the GTX 1080 Ti graphics card and the budget build has the RX 580 graphics card. When doing the performance test for both, it was seen that you would get better frames per second on the GTX 1080 Ti then the RX 580 and that is because of the Core Clock speed and the Memory Clock. The GTX 1080 Ti has a higher clock speed than the RX 580.
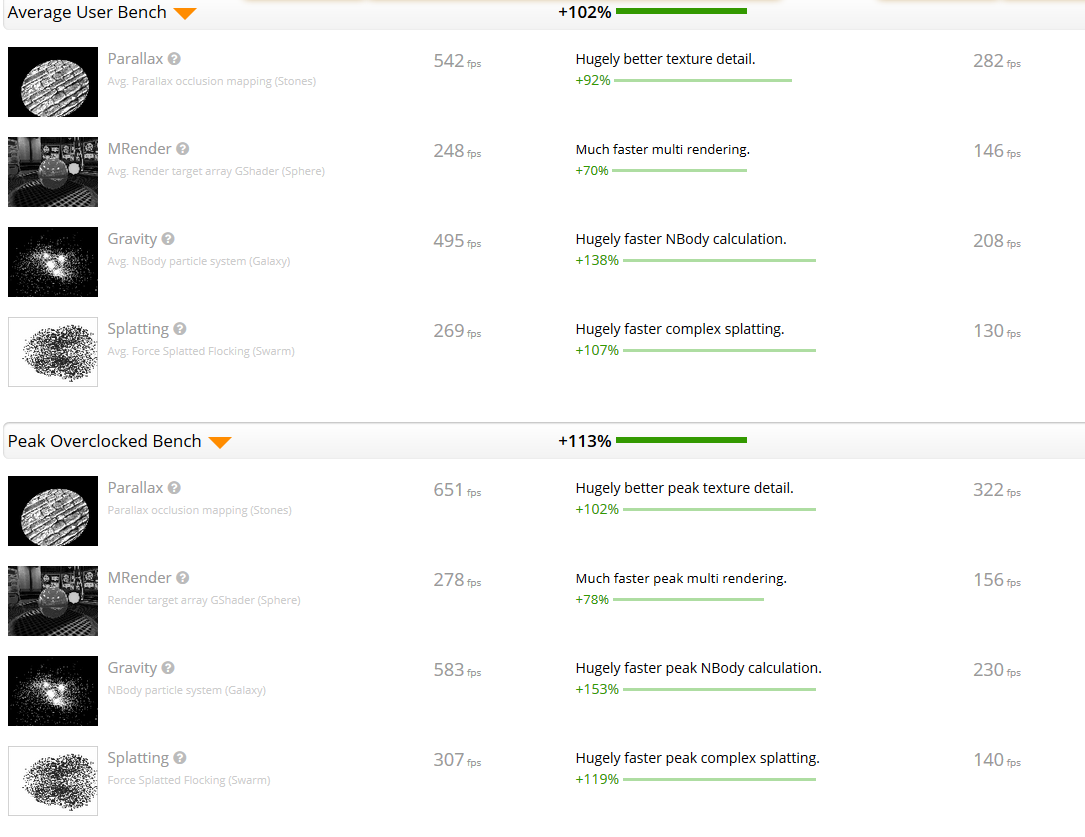
The data below shows the performance side by side of both graphics card in running different applications at different speeds. The GTX 1080 Ti outperforms the RX 580 in terms of getting the highest FPS (frames per second) count. This makes the 1080 Ti more expensive and made for people that want better FPS when editing videos and playing games on maximum settings.
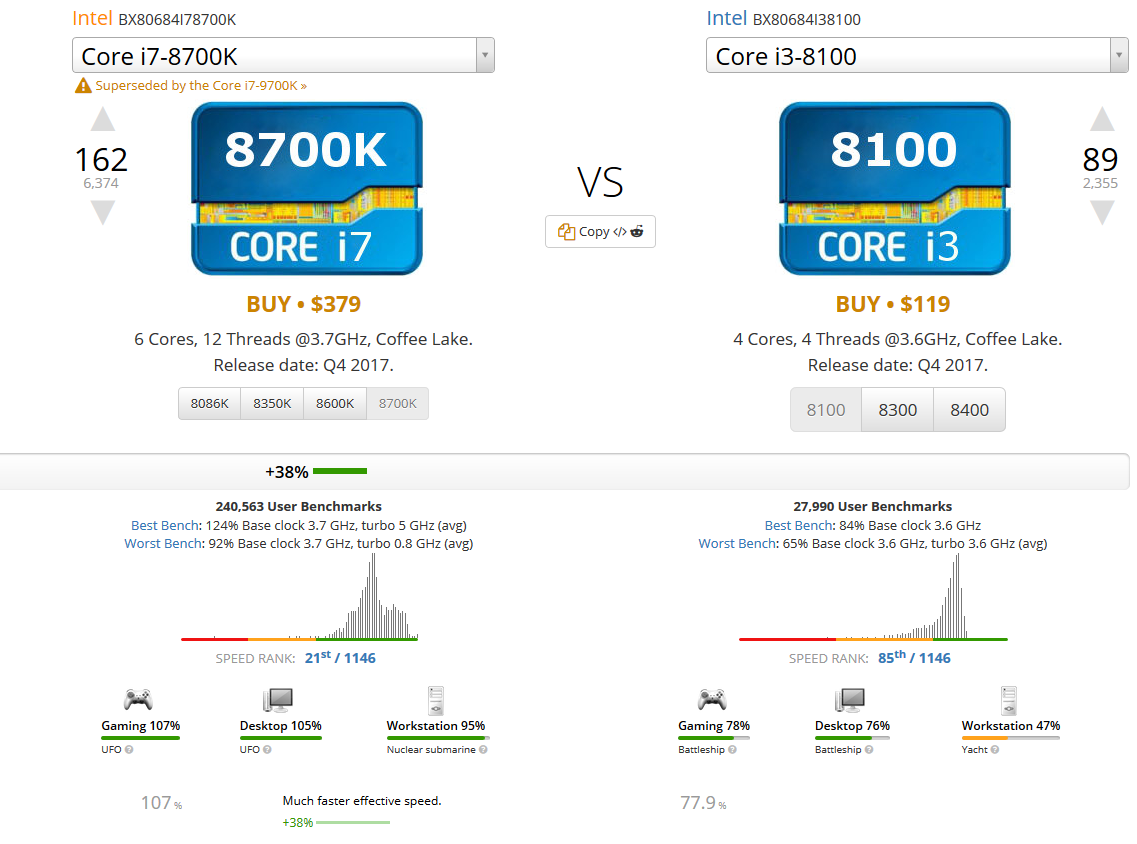
Chart comparison of CPU:
These results of the main two components of the two computer shows that the personal build is well above average at performing different tasks such as gaming and using it to render videos. However, the budget pc is okay at doing the same jobs and will perform less than the personal pc but will still manage to complete the tasks. However, even though the same task can be complete, it will complete at a slower pace and will put more strain on the computer parts. This will in return decrease the life expectancy of the computer. The tests showed that the number of cores and threads have to do with the reduction in performance. The more cores and threads the CPU has the better the performance. Also, the heat that was dissipated from the fan cooler was not as good as the liquid cooler, so that cause the performance of the budget pc to go down.
Conclusion:
These two pc were put side by side to see how they perform, and the results are showing that the personal build is made for people that are willing to pay for good quality parts that can handle multitasking. The personal build is capable of being able to render videos at a fast rate as well as being able to game on high settings with a high frame rate. The budget pc is for someone that wants to a computer that can do the same job as the personal build but at a slower rate but also to be able to do some light gaming on it. The budget build is perfect for student in college as it provides reliable speeds. The personal build is meant for people that are willing to go the extra mile for better speeds and higher graphics when playing games or watching videos on a 4K monitor. These performance test also show that scores can vary depending on the environment. The cooler the environment the better the performance as the conductivity of the parts are greater.